Among all the softwood species, Western Red Cedar is considered to have the very best finish- retention features.
Guide To Finishing Western Red Cedar. The most important characteristics of Western Red Cedar (hereinafter abbreviated to ‘cedar‘) that contribute to its exceptional ability to accept and retain many different types of finishes are its outstanding dimensional stability, fine texture, a pattern of growth that results in narrow bands of summerwood, and freedom from pitch and resin.
Dimensional stability is related to the wood’s density. The less dense the wood, the less it tends to shrink and swell in response to changes in moisture content. Cedar is a low density wood exhibiting excellent dimensional stability.
Texture refers to the general coarseness of the wood surface, primarily caused by the sawing, planing or sanding process.
Pattern of growth, or springwood and summerwood, is the annual increments or bands of tree growth. Cedar has a lower percentage of summerwood than most other species.
Pitch or resin can be found in most softwoods but is absent in cedar. However, water-soluble extractives which give cedar heartwood its natural decay resistance are present.
Quality control during manufacture improves cedar’s finishing characteristics
Cedar produced by members of the Western Red Cedar Lumber Association is well-manufactured under strict quality controls. Two manufacturing processes, however, may affect the performance of coatings:
Surface texture influences the choice of finish that should be applied to provide the best performance. Natural finishes such as penetrating stains are preferred for textured surfaces, whereas paint systems are more suitable for smooth-surfaced cedar.
Moisture content may increase or decrease according to the environment. Finishing wood that is obviously wet may increase the risk of coating failure. It is best to finish cedar when its moisture content has stabilized at the level that will prevail during the service life of the product.
Construction practices influence the performance of finishes
The moisture content of wood at the time of construction and during the structure’s lifetime is the most important factor impacting upon the performance of the finish. Good construction practices are critical to the prevention of excessive moisture build-up in wood.
While it is not within the scope of this publication to describe in detail the many construction techniques necessary to maximize performance, the following brief checklist should prove helpful. More comprehensive information can be found in the WRCLA publications Installing Cedar Siding.
*** To prevent unsightly stains, only corrosion- resistant hot-dipped galvanized, aluminum, or stainless steel fasteners should be used with cedar. Stainless steel is the best choice.
*** Proper flashing methods should be used in all aspects of construction, including those not directly related to the siding and trim.
*** Provide adequate overhangs at eaves and
*** Install drip caps over windows and door
*** Allow at least 6 inches clearance between bottom of siding and the ground line.
*** Install vapor retarders on the warm side of walls to minimize condensation in walls.
*** Vent high humidity areas such as kitchens, laundries and bathrooms.
*** Vent attics and crawlspaces
Cedar siding with a factory applied machine-coat of primer and/or top coat keeps its long lasting good looks. Some applicators offer long term performance warranty programs.
Exterior Finishes for Cedar Siding and Trim
According to the Western Red Cedar Lumber Association, Cedar should not be left to weather
Even though cedar weathers over time to an attractive silver-gray patina that has a certain architectural appeal, research chemists and wood scientists strongly recommend that some form of protective finish be applied to prevent surface degradation.
Weathered surfaces provide a poor substrate for finishes. Even a few weeks of exposure will decrease cedar’s ability to hold a finish. Once the finish-wood interface fails, the coating will debond, blister, crack, flake or peel.
The longer the period of weathering, the more rapidly the finish may fail.
Artificial weathering of cedar can be accomplished by applying a commercially prepared bleaching stain which is essentially a water-repellent finish containing pigments and other additives.This finish is most effective on textured cedar.To maintain a uniformly gray wood surface, bleaching stain may have to be re-applied periodically.
Natural coloration of newly milled cedar can be retained by applying finishes that contain ultraviolet blockers. Finishes containing both an effective mildewcide and ultraviolet protection are recommended. Since these finishes contain a low percentage of solids, they tend to be high maintenance. Penetrating oil-based stains or light-pigmented natural tones can also be applied to provide uniform color and protect the wood.
Caution: Cedar should not be left unfinished for 6 to 12 months as suggested by some finish manufacturers and others.
Cedar accepts many types of finishes
The choice of an exterior wood finish for cedar depends upon the desired appearance and the degree of protection required. Conversely, the amount of protection provided to the wood depends on the type of finish selected. Finished wood is a combination of two widely different materials and the properties of both must be considered to achieve the most durable wood-finish system.
Note, however, that with all types of finishes, the manufacturer’s recommendations should be followed. Cedar’s excellent finishing characteristics cannot compensate for products that are unsuitable, of inferior quality, or improperly applied. Finishes perform best when the coating is applied to all surfaces (face, back, edges and ends).
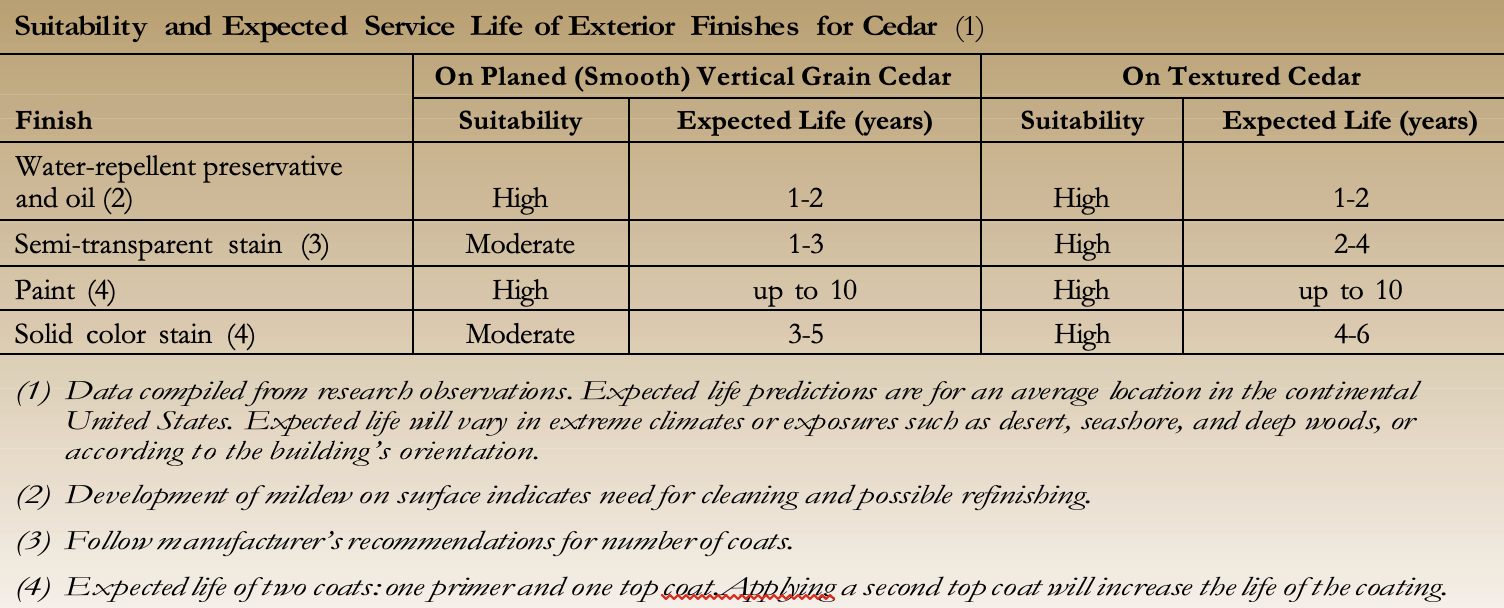
In general, finishes for cedar can be grouped into four categories: (1) opaque coatings, such as paints and solid- color stains; (2) semi-transparent stains; (3) natural finishes such as water-repellents and water-repellent preservatives; and (4) oils.
Wood preservatives and fire-retardant coatings may also be classified as finishes in some respects but are not within the scope of this publication.The expected service lives of different exterior finishes for cedar siding and trim are summarized in the table opposite.
Opaque finishes
Paint provides the most surface protection against weathering and wetting by water while providing color and concealing some of the wood’s characteristics.
Although paint can reduce wood’s absorption of water, paint itself is not a preservative.
Alkyd oil-based primers usually offer the best shield against discoloration by water-soluble extractives. Latex paint, particularly 100% acrylic formulations, remain more flexible with age and are better able to accommodate dimensional changes by stretching and shrinking with the wood.
Solid-color stains are opaque finishes with fewer solids than paint.Available in a wide spectrum of hues, solid- color stains obscure the woods true color but allow some of the natural characteristics and texture of cedar to remain. Solid-color stains perform best on textured surfaces.They are non-penetrating and, like paints, form a film.A stain-blocking primer should be applied first, followed by a 100% acrylic latex-based top coat.
Natural finishes
Water-repellents and water-repellent preservatives may be applied to cedar used above ground.These formulations reduce water absorption in the short term. The addition of a fungicide that inhibits the growth of mildew and decay fungi will further increase wood’s durability.
A low-wax-content water-repellent preservative applied to newly-milled cedar as a single-coat pre-treatment before painting may help reduce discoloration caused by bleeding of water-soluble extractives.
Semi-transparent stains may be latex or oil-based.The semi-transparent nature of the stain, due to its low solids content, does not block all ultraviolet radiation and some will reach the wood’s surface. Latex stains do not penetrate the surface and are not as durable.
Caution: Transparent, non-flexible, film-forming finishes such as lacquer, shellac, urethane, and varnish are not recommended for exterior use on cedar. Ultraviolet radiation can penetrate the transparent film and degrade the wood. Regardless of the number of coats, the finish will eventually become brittle, develop severe cracks and then fail.
Surface preparation
The surface condition of the wood to which the finish is to be applied can substantially affect the performance and hence the life expectancy of the finish.The following procedures should prove helpful:
New wood such as cedar siding and trim, should be protected from the weather before, during and after construction. It is seldom necessary to carry out extensive surface preparation providing the wood has not weathered for more than two weeks and is clean and dry. If it has been contaminated by dirt, oil and other foreign substances they must be removed.
For smooth-planed, flat-grained cedar, some surface preparation may be desirable. On flat-grained wood, the surface should be scuff-sanded with 50-60 grit sandpaper.
This procedure will greatly increase the coatings performance but will not detract from a smooth finish. Surface preparation is not necessary for textured cedar.
Weathered new wood that has been exposed to the elements for longer than 2 weeks may have a degraded surface that is unsuitable for painting. Preparing the surface by sanding, brushing, and washing before applying the finish is recommended.
Paint finishes must be removed if the old surface is severely peeled, blistered, or if cross-grain checking has occurred because of excessive paint build-up.The removal of a film-forming finish is also necessary if a penetrating stain or water-repellent finish is to be applied to a previously painted or solid-color stained surface. Note that changing from a film-forming to a penetrating finish sometimes does not give satisfactory results because residual paint inhibits absorption.
Finishes can be removed by sanding, wet sandblasting, pressurized water spray, electrically heated paint removers and chemicals.Although quick and easy, sandblasting and pressurized water spray are not recommended unless extreme care is taken to avoid damage to the wood’s surface. Special precautions to ensure worker safety must be taken if the old paint is of the lead-based type.
Weathered water-repellent preservative finishes should be cleaned with a non-ferrous bristle brush to remove loose fibers and dirt. If the surface is soiled, it may be scrubbed with a mild detergent solution. If mildew is present, it should be controlled.The surface should be thoroughly rinsed and allowed to dry completely before refinishing.
Caution: Never mix bleach with detergent containing ammonia as the fumes can be harmful or fatal.
Weathered penetrating stains on mildew-free surfaces are relatively easy to refinish. Excessive scraping or sanding is not required.A stiff, non-ferrous bristle brush may be used to remove surface dirt, dust and loose wood fibers before applying the stain.
Application of exterior finishes
How a finish is applied to cedar is as important for durability and good performance as is the finish-substrate combination chosen for the job. Finishes can be brushed, rolled, sprayed or applied by dipping.The application technique, the quality and quantity of finish applied, the surface condition of the substrate, and the weather conditions at the time of application can substantially influence the life expectancy of the finish.The application guidelines suggested here should be followed in concert with the manufacturer’s directions for the product.
Paints of all types such as vinyl-acrylic, modified-acrylic, and oil-based top coats are all suitable for cedar but test results show that good-quality 100%-acrylic formulations perform best.To achieve maximum paint life, follow these steps:
- On bare new or restored cedar, apply one coat only of water-repellent preservative (1% or less of wax by volume and content).Allow it to dry for the period of time recommended by the manufacturer. If the wood has been dip treated, a longer drying time may be needed. Do not paint before the solvent from the water-repellent preservative has evaporated because the paint may then be slow to dry, may discolor, or dry with a rough surface.
- Apply a good quality stain-blocking primer as soon as possible after the water-repellent has The primer coat is very important because it forms a base for all succeeding paint coats and should be used whether the top coat is oil-based or latex-based.Application rates recommended by the manufacturer should be followed.
- Apply the top coat over the If two top coats are to be applied, allow the first to cure for the period recommended by the manufacturer before applying the second. In cold or damp weather, allow extra time between coats.
Water-repellent preservatives should be used only on newly manufactured bare cedar, on restored bare cedar, or on cedar previously treated with the same type of product.Application of preservative by brush, pad, or roller followed by thorough back-brushing is equally effective. When cedar is treated after the structure has been completed, liberal amounts of the solution should be applied to all lap and butt joints, edges and ends of boards. Other areas vulnerable to moisture penetration, such as below doors and window frames, also need to be treated.
When used as a natural finish, the service life of a water- repellent is only one to two years depending upon the wood and the exposure.Treatments on textured surfaces generally last longer than those on smooth surfaces. Dip treatment prior to installation or repeated brush treatment to the point of refusal will enhance the finish durability.The more finish absorbed by the wood, the longer the service life.
If a water-repellent preservative is used as a pre-treatment before painting, apply only a single coat, and use caution to avoid excessive build-up.
Semi-transparent, oil-based penetrating stains may be applied by brush, spray, pad, or roller. Brushing will usually give the best penetration and performance. Spray or roller application followed by back-brushing is also an acceptable method of application.These oil-based stains are generally thin and runny, so application can be messy. Lap marks can be prevented by staining continuous lengths.This method prevents the front edge of the stained area from drying before a logical stopping place is reached. Working in the shade is desirable because the drying rate is slower. Stain that has been applied by spray without back-brushing is particularly prone to show blotchy patterns as it weathers.
Two coats of penetrating oil-based stain on textured cedar will provide longer service life than one coat, but only if the wood will accept the second coat. Stir the stain thoroughly during application to prevent settling and color change.Avoid mixing different brands or batches of stain.
Latex semi-transparent stains do not penetrate the wood surface, but they are easy to apply and less likely to form lap marks.These stains are film-forming and are not as durable as oil-based stains.
Solid-color stains may be applied to cedar by brush, roller, or pad. Brush application is usually the best.These stains act much like paint. One coat of solid-color stain is only marginally adequate on new wood. A prime coat with a top coat will always provide better protection and longer service.The best performance can be obtained if the wood is primed, then given two coats of stain.Top coats of 100% acrylic latex solid-color stains are generally superior to all others, especially when two coats are applied over a primer.
Unlike paint, a solid-color stain may leave lap marks.To prevent lap marks, follow the procedures suggested for semi-transparent penetrating stains.
Discoloration of cedar and finishes
Cedar enjoys a well-deserved reputation as a wood that takes and holds a range of finishes for extended periods. Nevertheless, the normal life of a finish will be shortened by degradation and discoloration.The causes of degrada- tion are many and have been discussed in the preceding pages.
The causes of discoloration, though not in themselves a failure of the finish, often requires remedial treatment.
Dirt is the most benign cause of discoloration and not usually a problem.A periodic cleaning with a mild detergent solution will usually restore the surface finish.
Mildew applies both to the fungus and to its staining effects on both the finish and the wood. Mildew is a common cause of discoloration of paint, solid-color stains and natural finishes. Restaining does not solve a mildew problem. When it is time to refinish, clean off the mildew with a commercial mildew-remover then refinish with a coating that contains an effective mildewcide.
Extractives bleed that discolor the finish is usually caused by moisture.To stop stains caused by extractives bleed, moisture problems must be eliminated. Mild staining is often washed away by rain over a period of weeks. In sheltered areas of the building where the stain persists, it may become darker with age and more difficult to remove. If washing with a mild detergent solution does not work, a commercial cleaner may help.
Iron stains may appear in two forms: the reddish brown discoloration caused by rust, and blue-black discoloration caused by the reaction of iron from nails and other metal objects with extractives from the cedar.To prevent these stains, use only hot-dipped galvanized, aluminum or stainless steel nails when fastening cedar.
Water stains often occur in combination with extractive bleed and mildew growth.These stains can be difficult to remove. Scrubbing the wood with an oxalic acid solution is sometimes effective.
Caution: Handle oxalic acid solution with care as it can be harmful.
Chalking is a property of the paint, not the cedar. It occurs when a paint film weathers or deteriorates, releasing pigment particles that act like a fine powder on the paint surface. Chalking is a common cause of fading of tinted or colored paints.
Cleaners and restorers for cedar siding and trim
Uncoated, weathered cedar siding or trim can often be restored to its original color by applying commercial products called cleaners, brighteners or restorers.
Although intended primarily for restoring horizontal wood surfaces such as decks, they generally work almost as well on vertical surfaces. Some products are formulated with thickening agents to help the liquid cling better to vertical surfaces.The manufacturer’s instructions should be followed for optimum effectiveness. For more information see ‘Restoring Deck Finishes’ (page 16).
Exterior finishes for Cedar Decks
Decks should be finished for optimal performance
Although cedar is a naturally durable wood ideal for decks, its performance is enhanced when protected by an appropriate finish. Decks have full exposure to sun and rain, which greatly accelerates the weathering process. In fact, so aggressive are the effects of weather extremes in some areas of the country that a deck may need cleaning, restoring and refinishing as frequently as every two to five years depending upon the finish used. Decks should never be allowed to weather before finishing.
The simplest, but most labor-intensive, finish to maintain on a cedar deck is a water-repellent preservative, which may have to be applied annually.The next easiest is a semi-transparent oil-based stain. Both types of finishes are extremely effective in stopping the absorption of water and are recommended. It is important to ensure that the product has been specifically formulated to withstand the abrasive effects of foot traffic.
Oil and latex solid-color stains, (also called heavy- bodied or opaque stains), paints, and other film- forming finishes are not recommended.
If there is uncertainty over whether to use a water- repellent preservative or a stain, first apply a water- repellent preservative. It is possible to switch to a semi- transparent stain when the deck needs to be refinished. Even if the deck has been maintained with a water- repellent preservative for many years, an oil-based semi- transparent stain will perform satisfactorily.
Water-repellent preservatives of some types are formulated with non-drying oils.These oils penetrate the wood to protect it against degradation.The deck surface may remain oily until the finish absorbs, which may take several days.
Semi-transparent stains are pigmented finishes.The pigments provide color and some ultraviolet protection and greatly increase the durability of the finish.
Apply finishes the full length of only two or three boards at a time to avoid lap marks. Do not apply more stain than the cedar will absorb because the excess stain will appear as a shiny area on the surface. For extra protection against mildew, an annual or even semi-annual application of a water-repellent preservative formulated with a mildewcide may be effective.
Restoring deck finishes
Proper cleaning and surface preparation by either chemical or mechanical means is essential to the successful restoration of a cedar deck. Negligence in removing dirt, mildew, algae, stains and weathered residues will lead to an unsightly deck and early failure of subsequently applied coatings.
Deck surfaces should be refinished when the cedar starts to lose its color.The new finish needs to absorb into the wood. Finishing too soon leads to inadequate absorption.
Finishing too late leads to excessive degradation of the wood surface.
Commercially available deck cleaners and restorers generally fall into three categories: paint strippers, bleaches, and oxalic acid-based formulas.These products contain hazardous ingredients and should be used with caution.
Paint strippers will also remove oil-based stains and latex stains. Most are supplied as ready-to-use liquids. After use, residual stripper should be thoroughly rinsed from the wood surface before any other coating is applied.
Bleaches are effective in counteracting mildew but do little to remove dirt or other surface deposits.Aggressive scrubbing with caustic cleaners such as bleach will remove surface wood fibers and result in the wood having a rough, unnatural whitish tone.
Oxalic acid-based products remove extractives bleed and iron stains but are not effective against mildew.
After application of these products the deck should be thoroughly washed with clean water and allowed to dry completely before finishing.
Good maintenance extends life of both finish and deck
A deck that dries after wetting will last longer than one that stays damp. Good maintenance practices for cedar decks include allowing proper water drainage; keeping the surface free of dirt, leaves, pine-needles and other debris; and moving planters, benches and other deck accessories from time to time to permit the deck beneath them to dry thoroughly.
Interior Finishes for Cedar Paneling, Posts, Beams and Joinery
Interior wood requires less protection
Cedar used in the interior requires less protection than exterior siding, trim and decks, consequently a much wider range of finishes, including many not recommended for outdoor applications, may be used. Conversely, not all finishes acceptable for exterior use can be used inside.
The finishes’ suitability for interior use should be verified with the manufacturer.
In most interiors, cedar needs nothing more than protection against abrasion and stains from water and other liquids that may be splashed on the surface and absorbed by the new wood. Finishes also provide an easily cleanable surface as well as modifying cedar’s color to complement a decorative theme.
Surface preparation
To achieve the best results, the wood should be precondi- tioned in the area of the building in which it will be used before it is actually installed.This will enable the cedar to achieve equilibrium moisture content.
It is good practice to experiment with the proposed finish on a small sample of wood identical to that to be finished, or to apply the finish to an unobtrusive area to assess the effect. Once the decision has been made on the type of finish, the same brandname product should be used throughout to avoid incompatible formulations and color variations.
A wide choice of finishes
The rich beauty of cedar’s natural colors can be enhanced or modified by applying any of a number of commercial finishes. If cedar is left in its natural state, some darkening of the wood can be expected as it ages and the color variation will become less pronounced.Application of transparent finishes will also darken cedar to some degree but they form a protective surface that is easier to maintain.
Bleached finishes result in a sunbleached driftwood look. It can be achieved with commercially available bleaching agents.After bleaching, the cedar can be left in its natural state or given a coat of clear sealer.
Clear wax is a finish option for smooth cedar. Few finishes bring out the inner luster of cedar so well.There are also unpigmented liquid waxes on the market which incorporate a penetrating vehicle.
Clear plastics are a new generation of non-yellowing polyester and are available in flat (matte), satin (semi- gloss) and gloss finishes from a number of manufacturers. When choosing a brand it is important to specify a non- yellowing formula unless an amber tint to the cedar is preferred. High-gloss polyurethanes provide the most durable finish but the highly-reflective surface may be objectionable to some.These products are not suitable for exterior use.
Danish oil tends to darken wood more than clear oils. This product is especially suited to high-humidity conditions such as bathrooms and kitchens. It is easily applied with a brush even to textured cedar, and can be easily cleaned with a damp cloth.
Clear lacquer can be used for smooth surfaces. It is an unobtrusive finish which helps to retain much of cedar’s natural beauty. It is not recommended, however, for kitchens and bathrooms or areas which will require more than a light dusting.
Because of their fast drying characteristics, some lacquers are best when applied with an air-less sprayer rather than brush. For best results two or more coats are recommended, sanded with the grain between applications. For optimum surface durability, the first coat may be of high gloss lacquer followed by one or two coats of matte or satin lacquer. On smooth cedar, a final coat of wax will impart a rich sheen to the wood.
Clear varnish is recommended only for smooth surfaces. It will inevitably add a richer, darker tone to cedar.Two coats applied by brush are acceptable for most areas but additional coats should be added for kitchen and bathroom use.The surface will be slightly brittle and may show scratches but these can be touched up with a tinted wax. Varnish-finished surfaces can be scrubbed, cleaned with soapy water, or wiped with thinners.
Varnish stains are varnishes to which color pigment has been added.Although more difficult to apply than wax stains, they are available in a broad choice of tones and tints.
Paint
Paint is an unlikely choice as an interior finishing medium because it will hide the intrinsic beauty of cedar. However, if it is desired to accent a feature wall or door for example, any of the following paints may be used:
Latex or oil-based paints should be used over a stain- blocking primer recommended by the manufacturer.
A more common interior use for latex or oil-based paints is as a tinting medium.A few pieces at a time should be painted and allowed to sit for a few seconds before wiping with a clean cloth.
By controlling the amount of paint used and the time that elapses before wiping, a wide variety of effects can be achieved while still allowing the grain to show through.
Enamels used over cedar require both a primer and an enamel undercoat. Check the manufacturer’s directions before application.
Glazing and antiquing is an innovative finishing
technique that employs transparent or translucent glazes – sometimes several layers of super-imposed glazes – over a base of alkyd or oil-based paint.Although this technique is more commonly used on woods of lesser quality and character, it is perfectly adaptable for use on cedar
Stains
All three types of stain – transparent, semi-transparent, and opaque – may be used indoors ( if approved by the manufacturer) to provide decorative color accent. Since there is less need for protection, lightly pigmented products can usually provide the required tone without hiding the natural grains of the wood. One brushed coat is normally sufficient.
As with exterior stain, all dirt and dust must be removed before applying.The stain should be stirred often and well to ensure color consistency, and a wet edge maintained at all times to avoid lap marks.
When choosing a stain, remember that it is much easier to darken an area by adding extra coats than lighten a color that was too dark to begin with.
Oil-based stains, both heavy-bodied and semi- transparent oil-based stains approved for interior use by the manufacturer, are suitable for cedar.They are particularly attractive when applied sparingly to textured surfaces. On smooth surfaces, wiping techniques offer varying degrees of transparency.
Wax stains for use only on smooth surfaces have an oil base and contains soluble wax.A wide choice of basic colors is available and these can be blended to achieve intermediate shades.The usual technique is to apply a single coat by brush and wipe off the excess with a cloth after two or three minutes.To achieve a uniform result it is best to apply stain to a small area at a time and then wipe before proceeding.