Bevel Siding Installation Guide
Spacing for the siding should be laid out beforehand. The number of board spaces between the soffit and bottom of the lowest piece of siding at the foundation should be such that the minimum overlap is not less than 1 in. The wider the siding, the greater the overlap can be (see Table 6).
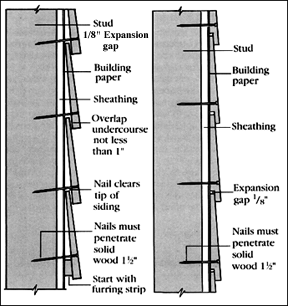
Start with the bottom course using a furring strip to support the lower edge. Each succeeding course overlaps the upper edge of the previous one by a minimum of 1 in. Rabbeted patterns are self-spacing, but leave 1/8 in. expansion clearance. Where possible, the bottom of the board that is placed across the top of the windows should coincide with the window cap.
Bevel siding should be face nailed to studs with 1-1/2 in. penetration into solid wood using one nail per bearing spaced at a maximum of 24 in. on center. Place nail just above the 1 in. overlap. Take care not to nail through the overlap of two pieces , see figure above .
Butt joints between boards should be staggered and made on studs. Fit snugly to other pieces and to trim and flashing. Ends should be caulked.

Table 6. Recommended Overlap for Bevel Siding
| Nominal Width (in.) | Overlap (in.) |
|---|---|
| 4 | 1 |
| 6 | 1 |
| 8 | 1 - 1 1/8 |
| 10 | 1 - 1 1/2 |
| 12 | 1-2 max* |
* Use for unseasoned 10 in. bevel siding. Notes: Do not exceed 2 in. overlap. Use the larger overlapsfor unseasoned sidings to allow for shrinkage and expansion. Take care not to overdrive fasteners when using larger overlaps
Table 7. Bevel Siding Dimensions (Seasoned)
| Thickness (in.) | Nominal Width (in.) | Finished width (in.) |
|---|---|---|
| 1/2 | 4, 6, 8 | 3-1/2, 5-1/2, 7-1/2 |
| 5/8 | 6, 8 | 5-1/2, 7-1/2 |
| 3/4 | 6, 8, 10 | 5-1/2, 7-1/2, 9-1/2 |
| 7/8 | 10, 12 | 9-1/2, 11-1/2 |
| 5/4 | 8, 10, 12 | 7-1/2, 9-1/2, 11-1/2 |

